Travel Resistance Band Workout: The Outdoor Athlete's Guide to Training Anywhere
You’re four days into a backcountry elk hunt. Your shoulders ache from the pack straps, your hips are tight from glassing ridgelines, and your knees are talking to you in a way they weren’t on day one. The nearest gym is fifty miles of dirt road away. But there’s a loop band at the bottom of your kit bag, where it’s been since you packed out of the house six days ago.
That band is about to earn its two ounces of pack weight.
Resistance bands get written off as a hotel-gym consolation prize, something you use when the real equipment isn’t available. That framing misses the point entirely. For hunters, hikers, and anyone spending serious time in the field, a travel resistance band workout isn’t a compromise. It’s the right tool: lightweight, packable, TSA-legal, and capable of loading your muscles in ways that match how you actually move in terrain. This guide gives you everything you need to use them well, from a pre-dawn warmup routine to end-of-day recovery work, with zero assumptions about flat floors, door frames, or electricity.
Here’s what you’ll walk away with: a packing recommendation, a guide to anchoring bands anywhere in the field, a 10-minute warmup routine, a full-body camp workout, a minimum-dose session for when time is short, and a recovery protocol worth doing every evening on multi-day trips.
Why Resistance Bands Are the Right Call for Outdoor Travel
A quality loop band weighs two to three ounces and compresses to roughly the size of a folded bandana. It costs less than a single night at a hunting lodge. And it lets you train your posterior chain, shoulders, and hips in a way that directly carries over to what you’re asking your body to do in the field.
The packability argument sells itself, but the functional argument is more interesting. Free weights load you in a straight line. Bands load you through a range of motion, with resistance that increases as the band stretches. That variable loading actually maps well to how muscles work during dynamic outdoor movement: ascending steep terrain, dragging a carcass, hauling a loaded frame pack over a ridgeline. It’s not the same as a barbell, but it’s not supposed to be.
For air travel to hunting destinations, bands are completely TSA-friendly. They go in your carry-on, they scan clean, and nobody cares. That matters when you’re flying into a remote area and checking gear you can’t afford to lose.
One durability note worth knowing upfront: latex bands degrade faster than most people expect when exposed to UV light, pine sap, or prolonged moisture. More on that later. With basic care, a good band lasts years. Without it, you’ll get a snap across the forearm at exactly the wrong moment.
Packing recommendation: bring one medium resistance loop band and one heavy. That covers everything in this guide. You don’t need handles, you don’t need a full set, and you don’t need an anchor strap with carabiners. Two bands, done.
Choosing Your Kit Before You Leave
There are three types of bands you’ll see in most outdoor and fitness stores. Here’s the quick version of what each is good for.
Loop bands (also called power bands or resistance loops) are continuous loops of latex or fabric. They’re the most versatile option for outdoor use because they work with foot anchoring, tree anchoring, or body weight with no attachments required. These are what most of this guide is built around.
Tube bands with handles are popular with gym-goers because they feel more like cables. For backcountry use, they’re fine but not necessary. The clips and carabiners add complexity, and the handles give you less anchor flexibility. Skip them unless you already own a set you like.
Mini bands are short loops, typically used around the ankles or just above the knees for glute activation and lateral work. Worth packing one if you have knee issues or want thorough warmup coverage. Not essential otherwise.
For resistance levels, most outdoor athletes should work with a medium band (roughly 30-50 lbs of resistance) and a heavy band (60-100 lbs). Lighter bands are fine for warmup and recovery work but won’t give you the load you need for serious lower body or pulling exercises.
On quality: fabric loop bands are more durable and don’t snap cold, but they have less stretch range than latex. Latex is more versatile but degrades faster in harsh conditions. Either works. Look for a stitched or continuous-loop construction with no seam at the join point, which is where cheaper bands fail first.
You need two bands. Nothing else.
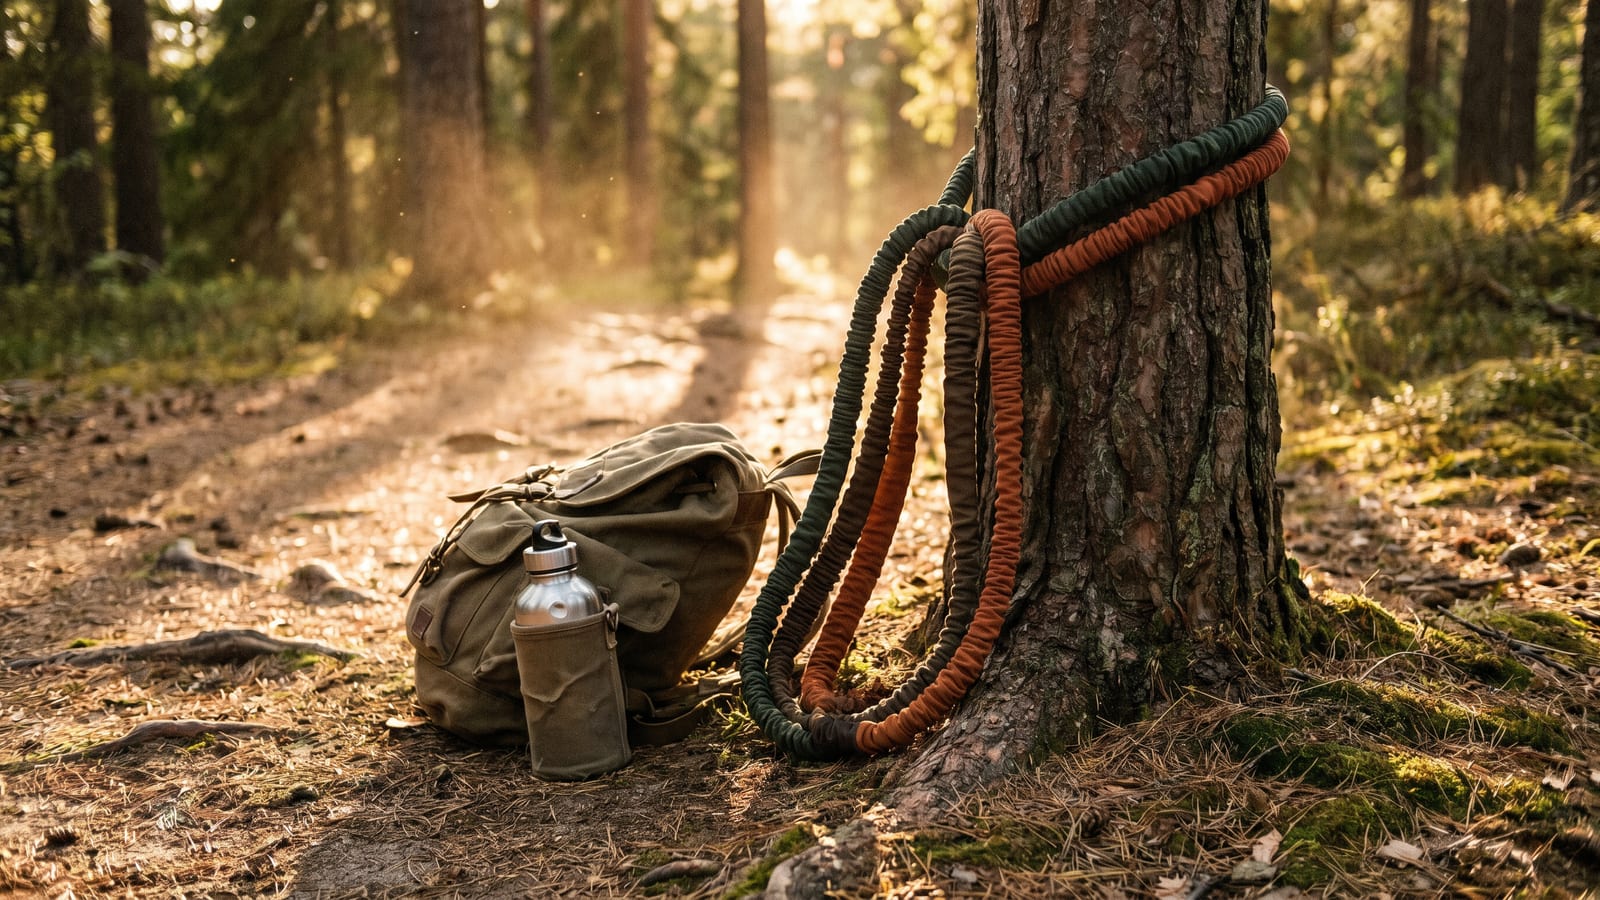
Setting Up Anywhere: Anchor Points Beyond the Hotel Door
Every resistance band guide on the internet assumes you have a hotel door and a foam mat. You may have neither. Here’s how to anchor a band in the actual outdoors.
Trees are your best option. Loop the band around a trunk and secure it with a square knot or a simple girth hitch pulled tight. A tree thicker than your thigh and rooted in solid ground will take more load than any door anchor. Test it before you load the movement by pulling the band to full tension and holding for a second. If the tree moves, find a different tree. If the bark is wet or the band slides, adjust the height and re-cinch.
Vehicle hitches and bumpers work well for low and mid-height anchor points. Loop the band around the hitch receiver ball or hook it directly to the hitch tube. Solid, stable, zero setup time. Good option in a hunting camp parking area or a trailhead lot.
Tent stakes driven into firm ground work for low anchors, specifically for movements like pull-throughs or hip flexor stretches where you’re pulling horizontally near the ground. Don’t trust a stake in loose sand or soft dirt for any significant load.
Pack frames can anchor the band at standing height if you hang the pack from a branch or prop it against something stable. Less load capacity than a tree, but workable for upper body movements.
For movements that don’t need an anchor at all, use foot anchoring: stand on the band, adjust the grip width to control resistance, and pull or press from there. Rows, Romanian deadlifts, overhead presses, and curls can all be done this way. You lose nothing on these movements by skipping a tree.
If you can tie a basic knot around a tree trunk, you have a full gym.
The Pre-Activity Warmup Routine (10 Minutes)
For hunters and hikers who are already active through the day, this routine is worth more than a full workout. Your joints need to be primed before a long push, not after. Skipping warmup on day one is fine. Skipping it on day four when your hips are already tight is how you end up limping out.
Do this before any significant physical effort: morning hike, packout, a day of glassing steep terrain.
Banded glute bridge activation: lie on your back, band looped around your thighs just above the knees, feet flat on the ground. Drive your hips up and squeeze at the top, pressing your knees out against the band. This wakes up the glutes before they’re asked to stabilize every step you take going uphill.
Lateral band walks: band around the ankles or just above the knees, quarter-squat position, step laterally ten times each direction. This loads the hip abductors and IT band in a way that directly reduces knee fatigue on uneven terrain.
Pull-aparts: hold the band in both hands at chest height, arms straight, and pull it apart until your hands reach shoulder width or beyond. Squeeze the shoulder blades together at the end range. Critical for anyone spending time with a pack on their shoulders.
Hip flexor stretch with band assist: anchor the band low (tent stake or vehicle hitch), loop it around one thigh, step back into a half-kneeling lunge position, and let the band pull the thigh forward while you drive your hip down and forward. This is a banded distraction stretch and it opens the hip capsule in a way passive stretching doesn’t.
Face pulls: anchor the band at face height, grip with both hands, pull toward your face with elbows high and thumbs pointing back behind you. This one protects the rotator cuff and is non-negotiable if you’re drawing a bow or hauling anything overhead.
Format: 2 sets of 15 reps each, move from one exercise to the next with no rest. Total time: under 10 minutes.
Done consistently across a multi-day trip, this routine is the single biggest factor in reducing knee and lower back fatigue. Not exaggerating.
The Full-Body Camp Workout (25-30 Minutes)
Use this on rest days at camp, mornings with a delayed start, or travel days between locations. It’s built around movements that directly improve your performance in the field, not exercises chosen because they look impressive.
Banded squat (band under feet, held at shoulders): 3 rounds, 12 reps. Leg endurance for sustained trail miles. Keep your weight in your heels and drive your knees out. If the medium band is easy, double it or shorten your grip to increase tension.
Romanian deadlift with band (foot anchor, hinge at the hips, soft knee bend): 3 rounds, 10 reps. This trains the posterior chain, the hamstrings, glutes, and lower back, which is exactly what takes the brunt of pack hauling. Push your hips back like you’re closing a car door with your rear end, not rounding your back.
Rear-foot elevated split squat (one foot on a log, rock, or cooler): 3 rounds, 10 reps each leg. Single-leg training is more transferable to hiking than bilateral squats because uneven terrain is never bilateral. Hold the band under your front foot and grip both ends for added resistance.
Banded row (tree anchor at mid-torso height, pull elbows back toward hips): 3 rounds, 12 reps. Upper back and lat strength for carrying and dragging. Squeeze hard at the end range and don’t let the band yank you forward on the return.
Banded overhead press (foot anchor, band pressed from shoulder height to overhead): 3 rounds, 10 reps. Shoulder stability matters more on a long pack trip than most people expect. This builds the scapular control to keep your shoulders from collapsing forward under load.
Pull-apart (as in the warmup, but heavier band if available): 3 rounds, 15 reps. For anyone who draws a bow, this is the most important exercise in the list. The rotator cuff takes a lot of abuse from repetitive overhead and pulling movements, and pull-aparts address it directly.
Pallof press (tree anchor at chest height, hold band at sternum, press straight out and resist rotation): 3 rounds, 10 reps each side. Anti-rotation core work, which is what actually protects your spine when you’re stepping over a downed tree or catching yourself on a loose slope. Crunches don’t train this. The Pallof press does.
Format: 3 rounds through the full circuit, 30 seconds rest between exercises, 90 seconds between rounds.
Progressive loading without switching bands: double the band for more resistance, shorten the grip (stand wider or hold the band closer to the anchor point), or slow the lowering phase to three seconds. Slowing the eccentric (the return phase) increases time under tension and makes a medium band feel significantly heavier.
The 10-Minute Emergency Session
Some mornings you have 10 minutes before first light. Some afternoons you get a short midday break while the rest of the party glass a basin. This is enough time to do something useful.
Four exercises. Two rounds. Twelve reps each. No rest between exercises, 60 seconds between rounds.
Squats, rows, hip hinges, pull-aparts. That’s it.
These four aren’t random. They hit every major movement pattern, front and back, in the fewest possible reps. That’s the whole point. This won’t build new fitness. It maintains what you have and keeps your joints moving through their full range on days when you’d otherwise spend 12 hours walking and sitting. Do it anyway.
Post-Activity Recovery Work (10 Minutes)
The most underused application of resistance bands for outdoor athletes. Most people pack them for working out and never touch them for recovery. That’s backwards on a multi-day trip.
Hip flexor decompression stretch with band assist (same as the warmup version, held longer): 60 seconds per side. Hip flexors shorten from hours of walking and sitting around camp. Leaving them tight is how you develop low back pain by day three.
Banded piriformis stretch: sit on the ground, loop the band around one knee, and use it to gently pull the knee across your body while your foot stays flat. The piriformis sits deep in the glute and gets hammered by uneven terrain. Stretching it takes pressure off the sciatic nerve.
Lat stretch with overhead anchor: loop the band over a high branch, grip with one hand, and lean back into the stretch with your hips shifted to the side. Hold 45 seconds per side. Your lats take a beating from pack straps and this lengthens them back out.
Banded hamstring stretch: loop the band around one foot while lying on your back, leg straight, and use the band to pull the leg toward your chest. Much easier to hold the stretch consistently than with your hands, and you can modulate tension without effort.
Sixty seconds per stretch, each side where applicable. Done in under 10 minutes. Do this every evening on multi-day trips, not just when something hurts.
Band Care and Longevity in the Field
A good band lasts years if you treat it halfway decently. Most band failures in the field are preventable.
Keep bands in a drybag or stuff sack when not in use. Moisture is the main enemy of latex. Even a dry stuff sack is fine; the goal is keeping them separate from wet gear.
Before every session, run the band through your hands and look for nicks, small tears, or spots where the surface has gone tacky or discolored. A band that snaps under full load will leave a welt. It’s not dangerous, but it’s unpleasant and avoidable.
Below freezing, latex becomes brittle. Warm the band in your hands or tuck it inside your jacket for a few minutes before using it. A cold band pulled hard can crack at the stress point. Fabric bands handle cold better but still benefit from warming up.
Keep bands away from tree sap, fire smoke residue, and direct sun when stored. Sap degrades latex fast. UV exposure over weeks breaks down the material at a molecular level you won’t see until the band fails.
That’s the whole maintenance protocol. Store them dry, check before use, warm in the cold. A band you take care of will outlast the hunting boots you’re wearing.
One band. Works anywhere you can find a tree, a truck, or flat ground. The only thing stopping you from using it is the same thing that stops most people from doing anything good for themselves in the field: forgetting it’s there.
Pack it at the top of the bag.