Hunting
How to Zero a Rifle Scope at 100 Yards
You’ve mounted your new scope and you’re ready to get it dialed in. Here’s how to zero a rifle scope at 100 yards - the right way, with the practical details most guides skip.
Why 100 Yards Is the Standard Hunting Zero
Most hunters zero at 100 yards because it works. Here’s why.
The 100-yard zero puts your bullet’s mid-range trajectory peak right around your zero distance. For most common hunting calibers, this means your bullet stays inside a 3-inch circle from point blank out to roughly 250 yards. That flat shooting window is the whole point - you can hold center-mass on a deer at 150 yards and still make a clean kill without adjusting your aim.
| Caliber | 100-yd zero, drop at 200 yds | Flat shooting window |
|---|---|---|
| .308 Win | ~2.5–3” low | 0–220 yds within 3” |
| .270 Win | ~2” low | 0–240 yds within 3” |
| .30-06 Spfd | ~2.5” low | 0–230 yds within 3” |
Those numbers assume a 150–168gr hunting bullet at typical velocities. Your mileage varies by load, but the principle holds: a 100-yard zero is forgiving across the distances most hunters actually shoot.
What You’ll Need
Don’t overthink the gear list. You need:
- A stable rest: bench with front and rear bags, or field position (prone, sitting, whatever you hunt from)
- Sandbags or a bipod to support the forend
- A shooting buddy or clamp to hold the rifle while you step away to check targets
- Target paper or a purpose-made zero target
- Your rifle, scope, and ammunition - the same ammo you’ll zero with, because different loads shoot to different points
One thing you do not need: a boresighter. If you’re starting at 25 yards, boresighting adds steps without adding value.
Step 1 - Set Up Your Position
Stability is everything. If your rifle is rocking, swaying, or vibrating, you’ll never get tight groups - and you’ll blame your scope when the problem is your position.
On a bench: front rest under the forend, rear bag behind the trigger group to control pitch. Elbows braced, not resting on the bench top itself.
In the field: prone with a bipod and rear bag is the most consistent field position. Sitting works. Standing with a sling wrapped tight around your arm also works. The point is to shoot from the position you actually hunt from.
Barrel heat matters more than most beginners realize. A hot barrel wanders. Keep your strings to 3–5 shots and let the barrel cool completely before your next string. If you’re shooting a precision build, cool-down time between shots is not optional.
Step 2 - Start at 25 Yards (If Needed)
For a fresh bore or a new scope, 25 yards is your starting point. One key fact makes this work: at 25 yards, your scope adjustments are four times more sensitive than at 100 yards. One click = 1/4 MOA = roughly 0.26” at 100 yards, but only about 0.065” at 25 yards. That magnification works both ways - corrections you make at 25 yards transfer to 100 yards, multiplied by four.
The rule is simple: with a 100-yard zero, your bullet should hit about 3 inches low at 25 yards. If you’re centered at 25 yards, you’re 3 inches low at 100. Fix that at 25 yards, then move out.
When to skip to 100 yards: If your rifle was bore-sighted at the factory or by a gunsmith, go straight to 100 yards and save the 25-yard step. You’ll use more ammo getting on paper, but it’s one less transition.
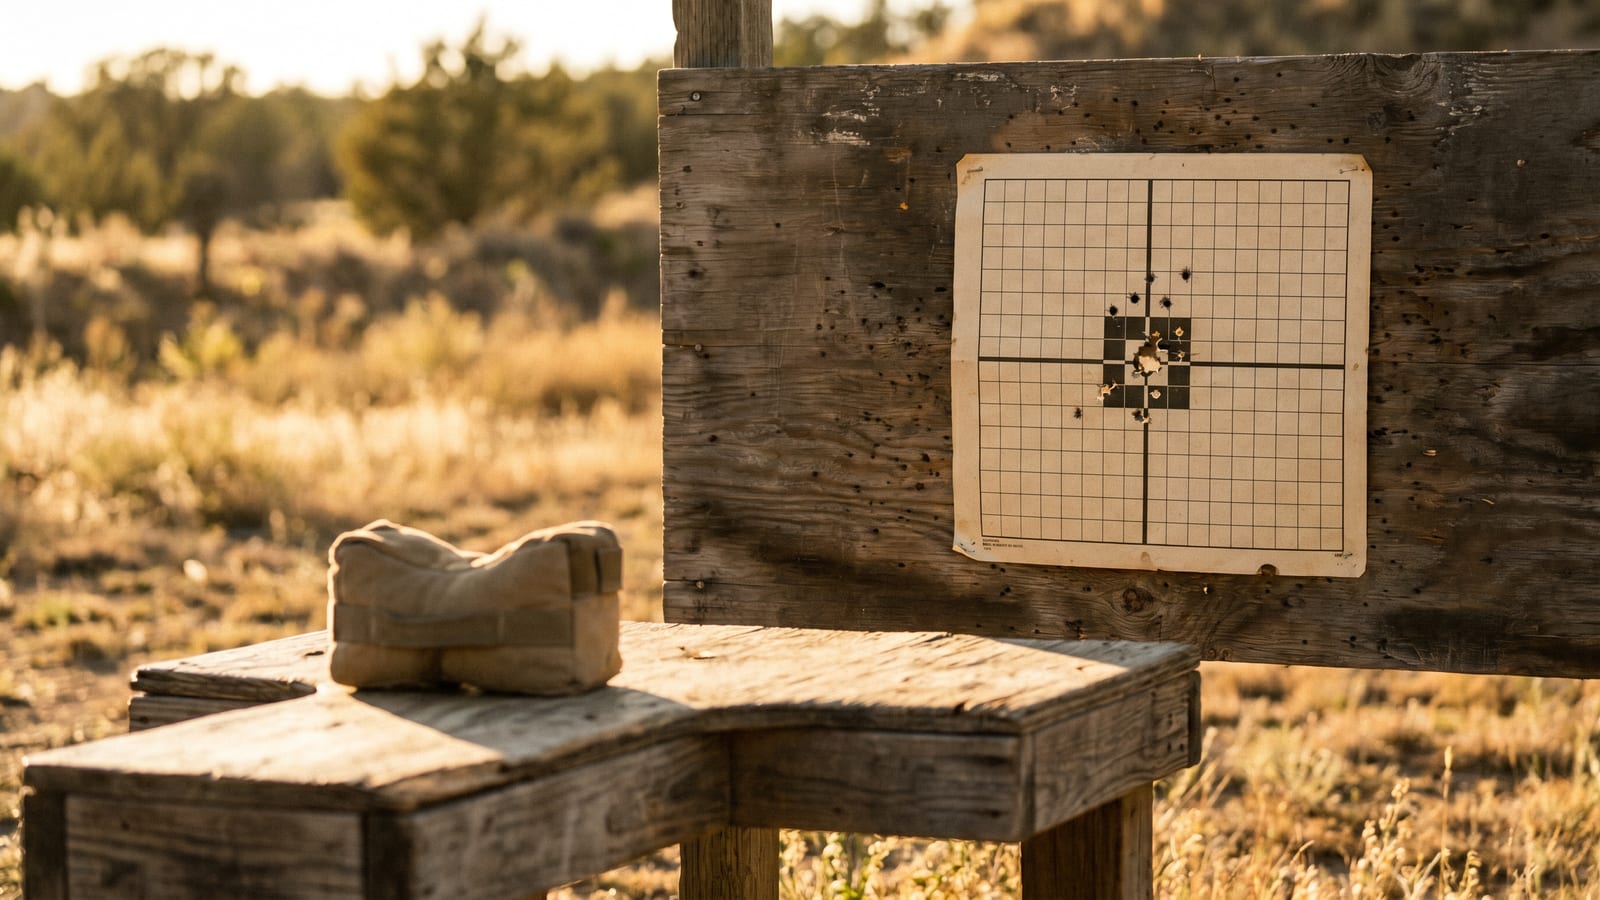
Step 3 - Shoot a Group and Read Your Target
Fire 3–5 shots. Single shots are misleading - one flier will send you chasing your tail. A group tells the truth.
At 25 yards: measure the vertical distance from your point of aim (the crosshair) to the center of your group. That offset in inches times 4 equals your MOA correction at 100 yards.
Example: your 3-shot group at 25 yards centers 2 inches below POA. That’s 2” × 4 = 8 MOA of correction needed at 100 yards. At 1/4 MOA per click, that’s 32 clicks of elevation up. At 0.1 MRAD per click, that’s about 22 clicks.
Write down your measurements before you touch the turrets. It’s easy to lose track after you’ve been shooting for a while.
Step 4 - Adjust Your Turrets
Elevation first, always. Once your vertical is dialed, correct windage.
Turrets are marked with arrows, but which direction they move the point of impact varies by manufacturer. Some scopes: dial up to move the group up. Others: dial up to move the group down. Check your manual or - faster - fire one shot, note where it hit, dial 4 clicks, fire again. If it moves the wrong direction, you’ve lost two shots learning the lesson.
For elevation: if your bullet hits 2” low at 25 yards with a 100-yard zero target, you need to move the group up by 2” at 25 yards. That requires 2” / 0.065” per click ≈ 31 clicks (round up to 32, you’re close enough).
At 100 yards, you don’t quadruple - one click = one click. Fire a group, measure, correct. A 1/4 MOA click = approximately 0.26” at 100 yards. A 0.1 MRAD click = approximately 0.36” at 100 yards.
Step 5 - Extend to 100 Yards and Confirm
Move your target out to 100 yards. You’re done with the math tricks - now it’s just feel and patience.
Fire another 3-shot group. Measure the center of the group relative to your point of aim. Adjust and repeat.
A solid hunting zero is a group under 1 MOA - roughly 1 inch at 100 yards. If you’re shooting tighter than that, your rifle and optic are doing their jobs. If your groups are running 1.5–2 MOA, something in your setup needs attention (see Troubleshooting below).
What to Expect at Closer Ranges
Here’s the payoff. Every hunter who zeros at 100 yards gets nervous when they aim at something close and their bullet appears to be hitting high. It’s not a problem. It’s physics.
| Distance | Bullet impact with 100-yd zero |
|---|---|
| 25 yards | 2.5–3” high |
| 50 yards | 1.5–2” high |
| 100 yards | Center |
This is normal. Your bullet is still climbing to its mid-range peak at close range, which puts it above your line of sight. Once you understand this, a 100-yard zero becomes intuitive: aim small at distance, and at close range your holdover is automatic.
Troubleshooting Common Problems
My group is over 2 MOA at 100 yards. Check your mount. Loose mounting screws are the most common cause of poor accuracy with a otherwise good optic. Torque to spec with a quality wrench - not a multi-tool. If the mount is tight, try a different ammunition lot. Cheap ammo with inconsistent powder charges will open your groups fast.
My shots are all over the place - not even forming a group. This is almost always the shooter, not the rifle. A true scope problem produces random scatter in all directions. A vertical string of shots means you are: anticipating recoil, jerking the trigger, or breathing at the wrong moment. Work on trigger control before you blame your glass.
The scope won’t move far enough in one direction. Verify the bolt has clearance - some mount setups contact the bolt body or receiver and limit turret travel. Check for burrs or machining marks in the ejection port. If the turret genuinely hits a hard stop and you still aren’t zeroed, back to the gunsmith.
Erratic shots - some touch, some fly. Barrel heat is the usual suspect. A hot barrel vibrates differently than a cool one. After 3–5 shots, stop and let the barrel cool 10–15 minutes. If the problem persists, check for a loose scope ring - not just the bottom screw, but all four.
Protecting Your Zero
You did the work. Now keep it.
After you’ve confirmed your zero at 100 yards, set your turret caps. Most scopes come with flip-style caps that snap over the turret bodies. They keep dust, moisture, and accidental bumps out.
If your scope has zero stops - a physical stop that prevents you from dialing below your zero elevation - set it now. Loosen the stop screw, dial all the way down until you hit the stop, then dial back up to your zero mark and tighten. Now you can dial up for a longer shot and return to zero by dialing down until the stop contacts - no counting clicks, no guessing.
Document your setup: rifle, optic, mount, ammo lot, temperature, and barometric pressure at time of zero. Ammunition lot matters more than most people realize - different lots of the same load can shoot to slightly different points.
Before every hunting season, verify your zero. Shoot a 3-shot group from a bench at 100 yards. A 1-inch group means you’re good. A 2-inch group: troubleshoot before you hunt. Mount, ammo, and temperature are the first things to check.
Final Thoughts
Zeroing a scope is not complicated. Set up stable, measure your offset, dial the correction, confirm at distance. The mechanical process takes an hour your first time and twenty minutes once you know what you’re doing.
What most guides skip - the close-range impact numbers, the flat-shooting window, the troubleshooting steps, the zero documentation - that’s what separates a zeroing guide from a scope-owners manual. Now you have both.
If any part of this felt unclear, the only way to learn is to get to a range and start shooting.