Camping
Solar Spotlight Camp Security That Actually Works
A good night at camp ends with food stored, gear secured, and a manageable set of things that could go wrong. Solar spotlight camp security is not a complete system on its own, but it is the one piece most campers skip and then regret when something triggers at 2 a.m. and they have no idea what it was. This guide covers what actually works, what the specs mean in practice, and how to position lights so they do the job instead of just glowing.
Why Camp Security Lighting Is Different from Home Security Lighting
At home, you have walls, a fixed perimeter, and outlets. Motion lights sit on soffits above garages, light up driveways, and run on household circuits. None of that translates to camp.
Your perimeter is defined by where you pitched a tent. Your power source is whatever the panel soaked up that day. A raccoon investigating a cooler is a different problem than opportunistic theft at a busy campground. Weather changes hour by hour. Trees and terrain block both light and sun. And you have to pack everything in and out.
Residential solar security lights assume daily sun, a vertical surface to mount on, and a homeowner who is not carrying the unit three miles into the backcountry. That shapes what you should actually buy for camping. It is a different product category, and conflating the two is how people end up with a 4-pound spotlight they never bring past the car.
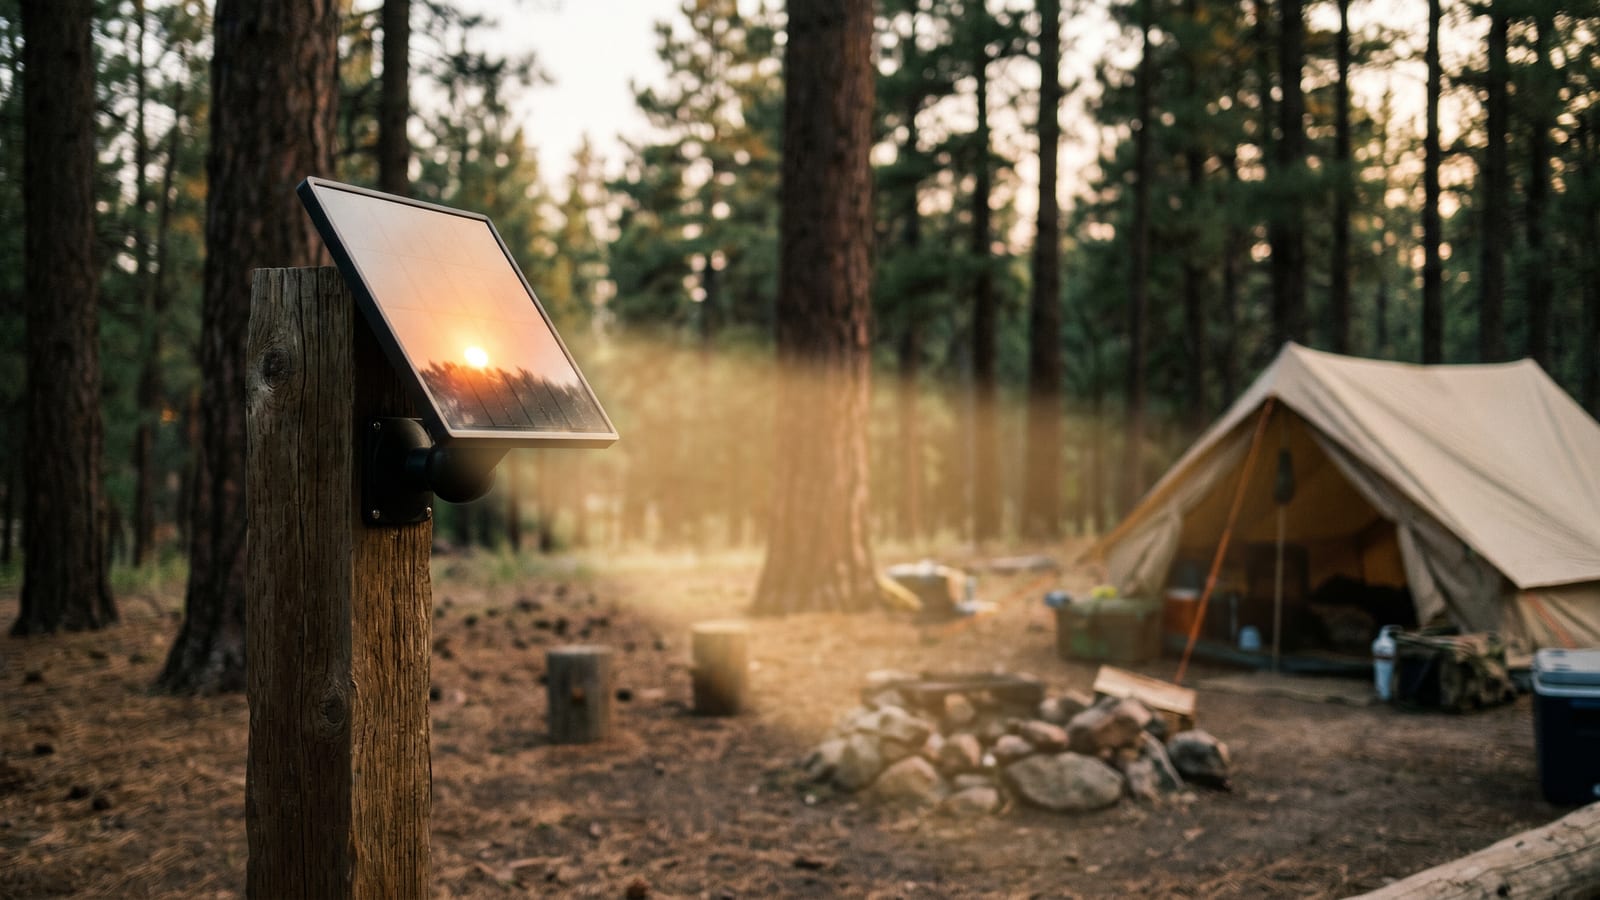
What to Look for in a Solar Security Spotlight for Camping
Skip the specs that sound impressive in a listing and focus on what matters in the field.
Lumens. Five hundred to 1,500 lumens is the practical range for a campsite. Five hundred lumens lights up a tent entry or a gear pile. Eight hundred to 1,200 lumens temporarily blinds someone looking into your camp at night. Above 1,500 lumens you burn battery faster and add weight you feel on a long hike.
PIR sensor range. Twenty-five to 40 feet is the sweet spot. Shorter than 20 feet and you get almost no perimeter coverage. Longer than 50 feet and the sensor trips on trail users or wildlife well outside your site. At a typical dispersed campsite, 30 feet is enough to cover the space between your tent and your cooking area.
IP rating. IP65 minimum. The digit 6 means complete dust protection. The digit 5 means water jets from any direction will not damage it. IPX4 (splash resistant) is not enough. IP67 can survive brief submersion and is worth the small weight penalty if you camp near water or in wet climates.
Battery runtime. Most units claim 8 to 12 hours on a full charge. That is under ideal lab conditions. In partial shade or after three overcast days, you are realistically looking at 4 to 6 hours of effective runtime. Get a unit with an external battery indicator so you are not guessing at dusk.
Panel type and efficiency. Monocrystalline panels outperform polycrystalline in low-light conditions. If you are camping anywhere with tree cover, this matters. A monocrystalline panel at 20 percent efficiency will charge meaningfully on a cloudy afternoon. A polycrystalline panel under the same trees will barely register.
Portability. This is where most residential units fail. Look for integrated designs where the panel and light are one unit. Separate panel plus separate light is workable at a car camping site. It is a liability on a backcountry approach. Weight under 1 pound for a backpacking unit is achievable. Two to 3 pounds is car camping territory.
Wildlife vs. Human Deterrence: Two Different Setups
This is where most guides give up and say it depends. It does not. Here is what actually works.
Wildlife deterrence. Bears, raccoons, deer, feral hogs. A sudden bright flash stops most animals mid-approach. What matters is the brightness at the food zone, not the perimeter coverage. A 500-lumen motion flash pointed at a bear canister or cooler area works. You need the flash to be bright and sudden. Strobe modes do not outperform steady motion-activated brightness for most wildlife. A sharp transition from dark to bright is what triggers the flight response. Strobe can actually attract some species. Place the light 10 to 15 feet from the food zone, angled down, and let the motion sensor cover the approach path.
Human deterrence. Opportunistic theft, not targeted break-ins. Most campground theft is a crime of opportunity: gear left visible, coolers within reach, electronics in the open. The goal is not to blind a determined intruder. It is to make your site more trouble than the next one. You need wider detection coverage, brighter output, and positioning at natural access points: the trail entry, the area between your tent and your vehicle, the gear you cannot fit in a bear canister. An 800 to 1,200 lumen unit with a 120-degree detection angle covers more ground than a narrow-spot unit. Dual-head units are worth the extra weight at car camping setups.
How to Position Solar Spotlights at a Campsite
Placement is where people consistently get it wrong. The light itself is simple. Here is what works.
One-light setup. One motion-activated solar spotlight covers a small site or a solo tent camp. Mount it at chest height or lower, pointed at the approach path to your tent. Do not point it at the tent itself or every time you step out at night the sensor trips and you light up your own camp. The panel goes where it gets the most direct sun during the day, even if it is a short walk from the light position.
Two-light setup. One light covers the tent perimeter. One covers the cooking and food storage zone. The tent perimeter light points at approach angles. The food zone light points at the immediate area around your cooler and bear canister. A natural chokepoint, trail junction, or vehicle access point is the single best position for a light.
Using natural features. Trees, vehicles, and terrain all work. Hang the light from a branch with paracord rather than relying on a stake in soft ground. Lean a unit against a rock or log to angle the sensor correctly. A vehicle bumper is a natural mount point at a useful height without any gear.
Panel orientation. Tilt the panel to face the sun, not to look neat. On overcast days in tree cover, even 30 minutes of direct sun through a gap will meaningfully recharge the battery. Check the panel position mid-day and adjust.
Common mistakes. Pointing the panel into shade is the biggest one. A unit that reads 80 percent charged at 6 p.m. might have been getting almost nothing since noon. Keep the sensor zone away from your tent door and your most-used path to the cooking area.
Top Solar Spotlight Options Worth Considering
For backpacking trips: Togo Portable Motion Light. Under 12 ounces, IP65 rated, 400 lumens, 30-foot sensor range. Folds flat and stuffs into a side pocket. Six to 8 hours battery on a full charge.
For car camping: TogTUY Dual-Head Solar Motion Light. Two separate light heads on a single solar panel. Mount it on a camp chair, a trekking pole, or hang it from a ridgeline. Twelve hundred lumens combined output, 120-degree detection angle, IP65 rating, 10-hour runtime. Just over 2 pounds. Bring it when you are not counting ounces.
Budget pick: Westzone Solar Motion Light. Around $20, decent build quality, 600 lumens, 40-foot sensor range. The panel and light are one integrated unit, which limits mounting options, but it is reliable and light enough for short hikes. Better than improvising with a headlamp duct-taped to a tree.
Fitting Solar Spotlights Into a Broader Camp Security Plan
A solar spotlight is a tool. On its own it handles one job: it makes noise or movement visible. That is useful, but it is not a complete security system.
Food storage is still non-negotiable. A bear canister or a proper Ursack in bear country. A hard-sided cooler with a lock in non-bear country. The light tells you something is approaching. The food storage keeps that approach from becoming a problem.
Gear lockdown matters at busy campgrounds. A cable lock through a group gear pile, an alarmed bag near your tent, or a pac-a-belay across your tent zippered entry all add a layer that the spotlight alone cannot. Noise deterrents like an air horn near the tent entrance are worth adding to a motion light setup.
Situational awareness is the last piece. Turn the spotlight on, step outside, listen. Give the camp a once-over before you sleep. The light is an asset, not a substitute for paying attention.
Solar spotlights handle the perimeter problem better than anything else you can pack. They are cheap, self-powered, and effective. Get one, set it up correctly, and stop losing sleep over what is rustling around your site.